Shoes or boots are one of the last items on most peoples list of garb items. And this is because of a lot of things, health issues, comfort and even fear – smile. In general most can get by with modern footwear as long as they pay attention to the style. I have not attempted to make footwear before either, but you are getting the fruits of my endeavors, otherwise what I have learned so far……

Figure 1 Egyptian slippers 4th to 7th Century
These are the slippers that started me on this quest. I found them in a catalog put out by the Metropolitan Museum of Art, titled “Textiles of Late Antiquity”. I picked this up because I am something of a needlework buff and constantly looking for more examples. While looking through the booklet, I came across these ‘very nice’ shoes. The blurb on the photo states “36. Shoes, 4th-7th century?, Said to be from Akhmim, Red leather with gilded design, L. 9 ¼ in. (23.5 cm), Gift of George F. Baker, 1890, 90.5.34ab”. There was no mention of these shoes in the write up of the collection. But I was in love; I decided that the picture alone was worth the price of the booklet.
The next thing in this path that happened was that my daughter gave me a pair of Indian shoes as a present. While looking at them one day, I noticed that the pattern of the inner sole was the same as in the Egyptian slippers above. Light bulb goes off and I think I have a Pattern!
Logic rears its ugly head, and I start looking for other examples in my books and on-line of Arabic or Islamic footwear. I knew about the pair of Ottoman boots at the Topkapi palace museum (Figure 2). I had been drooling over them for a while. The appliqué alone is drool worthy.
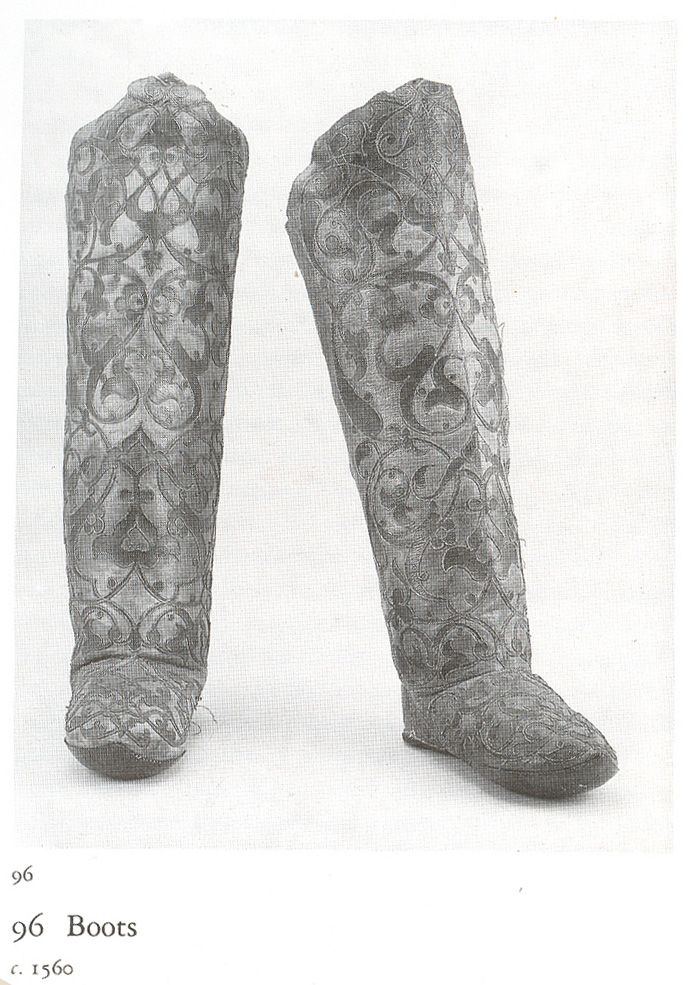
Figure 2 16th century Ottoman boots
The next example I found was post-SCA period Persian. Persian yea, 17th century boos. But they are beautiful and not leather but cloth (diversity good). These I found in Jennifer Scarce’s “Women Costume of the Near and Far East”, listed as ‘Sock Boots’
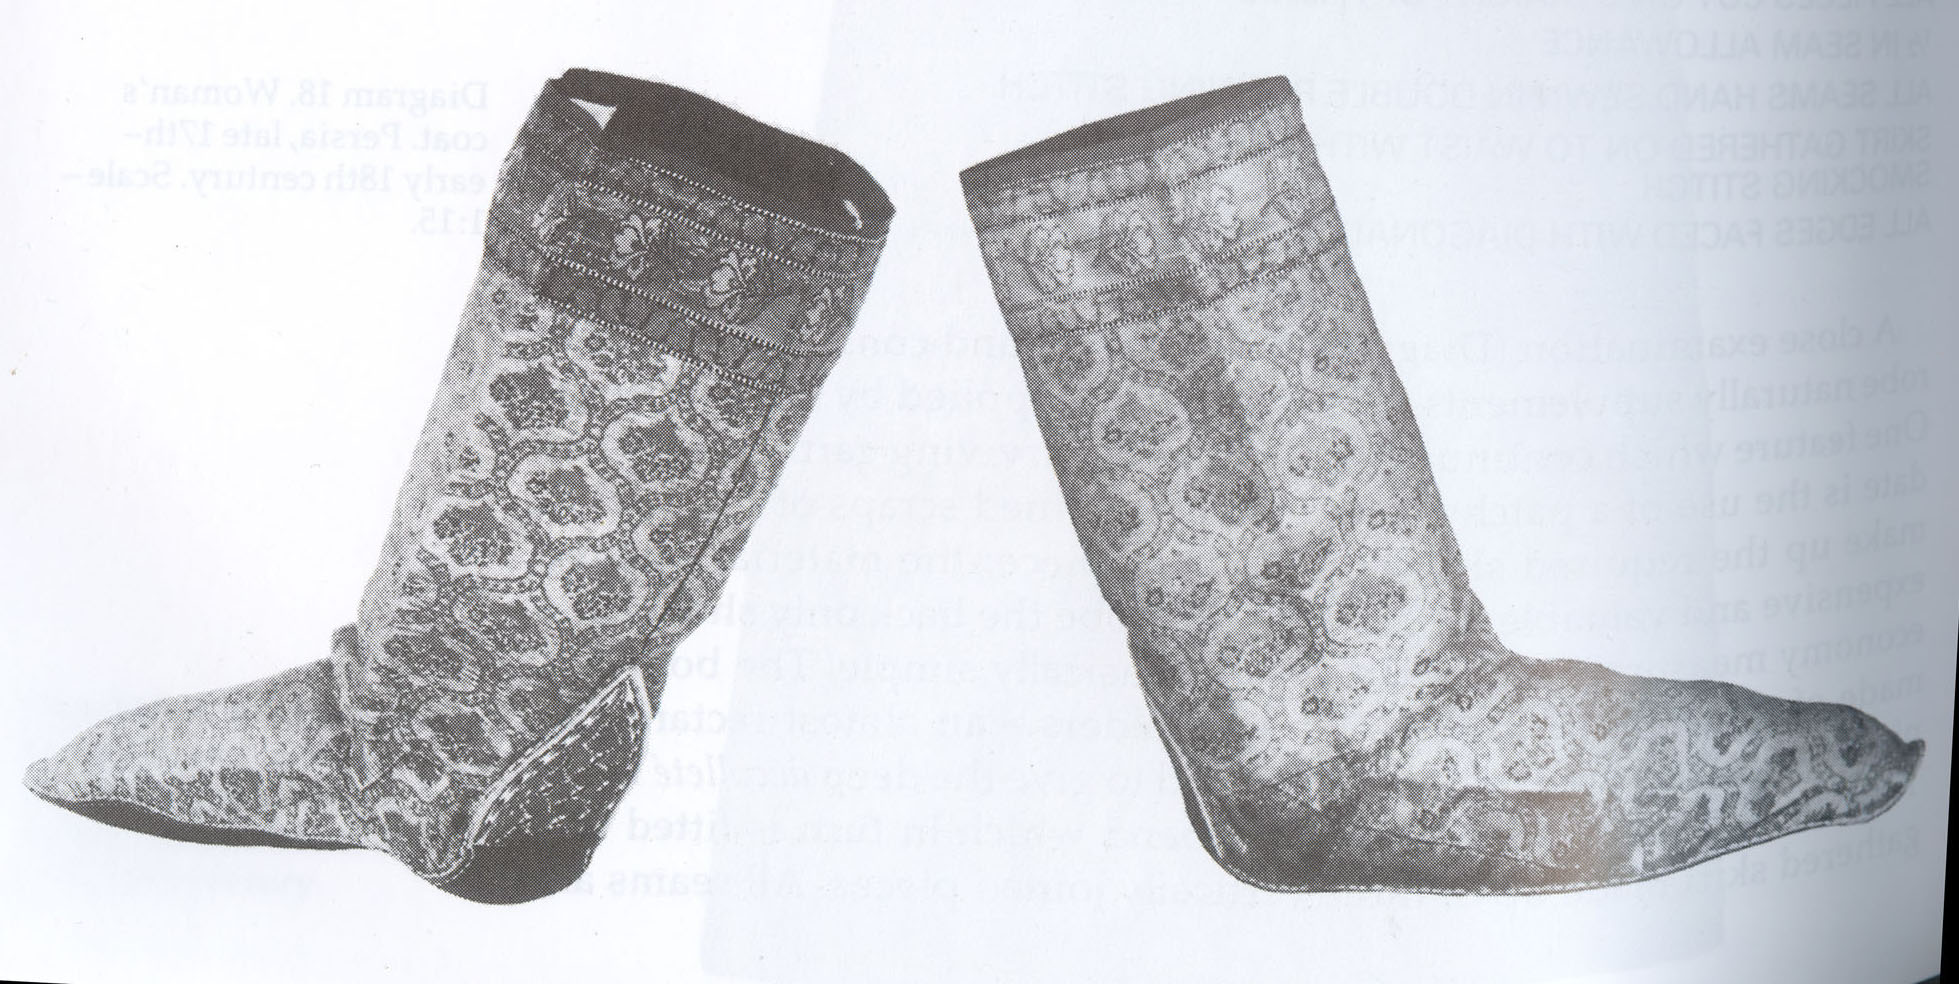
Figure 3 17th. century Persian Sock boots
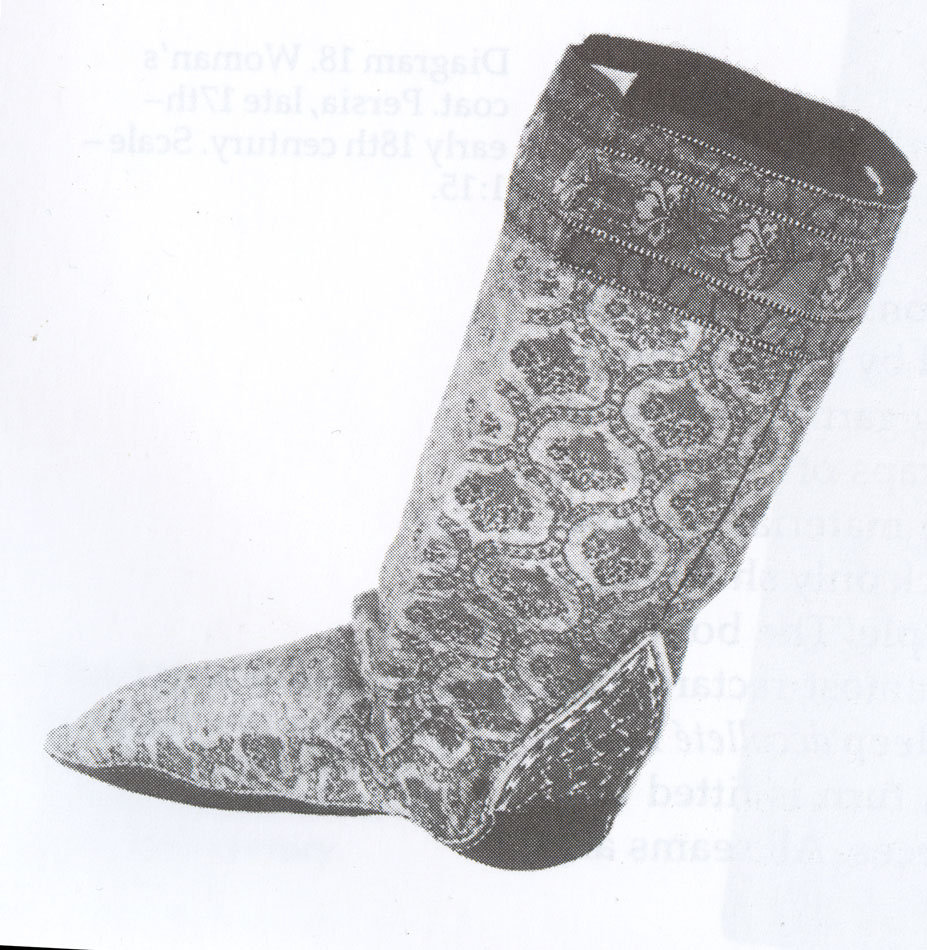
Figure 4 Persian sock boot detail
So now I had three extent pair of footwear from Islamic/Arabic areas. One did predate Islam but I knew that the basic style still continued to modern day (India, but with close contact with Persia through trade). The two others were boots rather than slippers but the sole shape looks similar from the photos. Could I draw up a pattern from the photos, most likely but more research could be helpful.
Thank you, I. Marc Carlson. He has pulled together more information than I have found any where else. I do realize that a lot of the shoes he has on his site are from the Museum of London book “Shoes and Pattens” but it is a wonderful collection of patterns.
I did draw up my own pattern. But I could look on his site (below), and check to make sure that I wasn’t forgetting anything. The main change I did to the slipper was adding a heel piece to make it into a shoe. This was for practicality, there are time when you need more coverage that a heel-less slipper.
One thing I do want to bring up. This is my take on these shoes; there is a very good chance that I am wrong. I am a true amateur in making shoes and making leaps of faith and wild guess. So far this is working for me, but I do not think this is ready for competition yet.
On to the Shoes:
The pattern I have developed can be used for slippers, shoes or boots with the addition of pattern pieces. The slipper only uses two pattern pieces, the sole and toe. By adding the heel piece, it becomes a shoe. Add the upper and filler, it becomes a boot.
For fabric, the best choice for the upper is leather. It is probably the most authentic as well as the advantage of not needing a seam finish. But cloth is still a variable option, note Persian Sock boots. If you do choose to use cloth, you will need a lining (this is an option with leather also). For the soles, I used leather (it helps to have an armourer as a husband at times).
Tools, you will need a punch or awl of some type to make stitching holes in the sole and possible the uppers also. Hand sewing Needles, leather or heavy tapestry ones (size 22 or larger). You will need at least 4 of whatever style you choose (I broke several) For threads, I used artificial sinew, but waxed linen or even heavy upholstery thread will work. What is nice to have, a thimble for your thumb or a small pair of pliers – sore thumbs are not fun.
Decoration is very individualist. On the original slippers, there is a decoration of gilded stamping across the arch of the foot. This would have been done before construction began on the flat piece of leather. Another option would be leather carving or standard leather stamping (not gilded). Painting and block printing would also work. Embroidery is another option both on leather and fabric.
Patterns:
The first thing we need is a tracing of your or whoever foot you are making shoes for. You will need to add approximately 1/4 inch all around the foot. I have added a point to the front toe area; this is not necessary and can be removed easily. I have noticed that this seems to be more of a late or Post SCA period detail, if you notice the earlier slipper have a very rounded toe. Most miniatures show a slight point on the toe which is what I was working for.
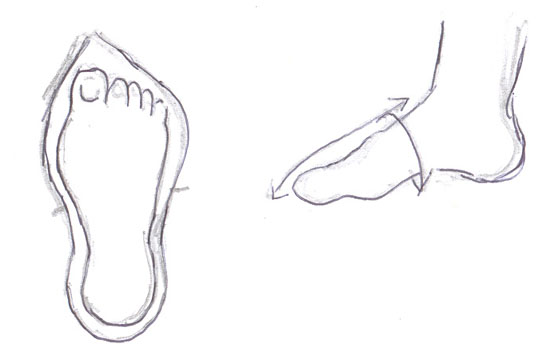
Figure 5 Outlining diagram
For the toe area you can use to methods to make the pattern. The first is to measure around the arch of the foot and from the arch to the floor in front of the toes. And then transfer these measurements to the pattern piece. The easier method is to take a piece of paper and mold it around the top of the foot. Press down to the floor and out line with a pencil. Clean up your marks and you have a pattern.
These are the main pattern pieces. I have labeled them as A the sole and inner sole, and B as the toe piece. These are the only ones you will need for the slippers.

Figure 6 Slipper Pattern
For the shoe you will add another pattern piece, C or heel piece. To measure for this pattern, place a mark on the sole where the toe piece come to on the sides with a tick mark on each side. Using a tape measure, measure this length and draw out a rectangle for this length plus ½ inch (1/4 on each side) for seams. The short sides should be about 2 ½ to 3 inches high. This is the only additional pattern piece you will need for the shoes.
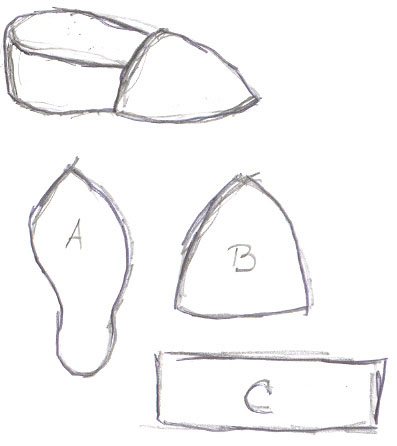
Figure 7 Shoe Pattern
For the boots, you will need a couple of more pieces; the boot top, the filler D and the Heel stiffener E. The Boot top is a large rectangle in shape (Note this was left off of the diagram, sorry). The size is determined by the fullness of the calf and the height of the boot. Measure your calf flexed, add 1 ½ inches (1inch ease + ½ inch for seam) for the width and then measure from the top of the foot to where you want the boot to end. Don’t forget your seams. The filler piece is a right triangle scrape to fill in between the shoe and the boot top, you will have to play to get it right.
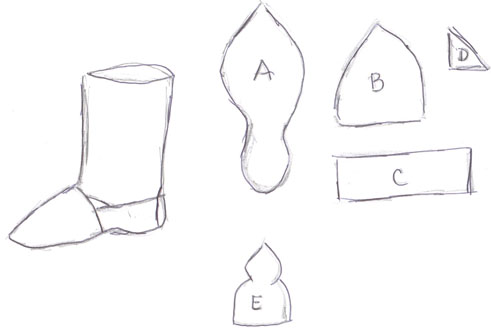
Figure 8 Boot Pattern minus Boot top
The last piece is the Heel stiffener. The best advice I can give you is to play with the basic shape until you get the size you are comfortable with. It needs to be at least a inch taller than your heel but not so tall that it catches you when you sit or walk.
Construction:
This is my method of construction; I do not if it is the correct one. One other option in construction is wherever or not they used the ‘turn shoe’ method. To tell you the truth, I do not know. As far as I can tell, the shoes I have pictures of do not show this method. But I could well be wrong.
Slippers – Prepare the toe upper. Leather unlined – fold the flesh side in on it self in the straight side of the toe pieces and punch stitching holes around the curved sides. Fabric or lined leather – sew the flat side seam (outside fabric to outside lining), turn so that the outsides are out. Tack around the curved edges to hold the lavers together. Punch holes in the sole for stitching. Thread two long lengths of thread with a needle at each end. Start at the top of the toe, using a running stitch with both threads at the same time. Work a little at a time until you reach the end of the upper on both sides. Place the inner sole in the slipper and punch stitching hole to match with the sole. Tie off the threads. Starting with a fresh piece of thread (only 2 needles this time), over lap the bottom stitching hole on one side, stitch until you complete the heel partition of the slipper. Tie off the threads.
Shoes – Basically you will be starting the same as with the slippers. Prepare your uppers if you are using fabric, both outside and lining. For leather punch stitching holes, attach the toe pieces as with the slipper but when you get to the edge slip the heel piece under the edge of the toe piece on one side. Take one of the stitching threads and work your way up and down (every other stitching hole, filling in on the way back). Then work your way around the heel to the other side. When you reach the far side, sew the heel/side piece to the toe. Tie off and slip in the inner sole. If your leather is very soft you might want to turn the edge down and stitch down to strengthen the edge. This is a good place to add decoration if need.
Boots – On the boots I have been torn between wherever to fully assemble the boot upper or to construct the shoe of the boot and add the upper boot piece. I finely decided to assemble the boot upper and then add the sole. This is awkward to stitch. I would suggest starting with one of the other styles first and then tackle the boots. You will still need to start with the toe and work down toward the heel. One suggestion, if you line your boots, one way to keep the lining from collapsing on the top of your foot is to glue or tack-glue the two pieces together across the toe and arch of the foot.
The detail that makes these boots Persian is the heel stiffener. This serves a purpose in that it will hold up the ankle of the boots, but it comes across as mainly decorative. On the 17th century Persian boots, this was embroidered. When I first saw it I thought that is was leather filigree (similar to a paper cut picture but in leather), but closer examination showed that it was embroidery. This detail shows up in several miniatures, usually as a contrasting color on a boot (red stiffener on black boot). This piece goes on last and is not attached to the sole, only the boot top.
Sources
Textiles of Late Antiquity, Annemarie Stauffer, 1995, ISBN 0870997688
Süleyman the Magnificent, J. M. Rogers and R. M. Ward, 1988, ISBN 1555216579
Women Costume of the Near and Far East, Jennifer Scarce, 1988 / 2003,
ISBN 0700715606
Shoes and Pattens : Finds from Medieval Excavations in London , Francis Grew, 2004, ISBN 0851158382
Footwear of the Middle Ages, I. Marc Carlson
http://www.personal.utulsa.edu/~marc-carlson/shoe/SHOEHOME.HTM
Sayyida Dinah bint Ismai’l
Dinah Tackett
March 2004